DIY Installation Guide
How to Install a Kangen Water Machine at Home (Step-by-Step)
Installing a Kangen Water machine is designed to be simple and user-friendly. Most users can complete the installation themselves without professional plumbing assistance.
This DIY installation guide explains the general installation process step by step, helping you understand what to expect before setting up your machine at home or in a small business environment.
What You Need Before Installation
Before installing your Kangen Water machine, make sure you have access to a compatible kitchen faucet, a nearby electrical outlet, and the installation kit included with your machine.
Most standard countertop installations require no permanent plumbing modifications and can typically be completed without professional plumbing assistance.
What's Included in the Installation Kit
Every Kangen Water machine includes the essential components needed for installation. While the included accessories may vary slightly between models, the items below show what is typically included with each machine.
Select your Kangen Water machine below to view the items included in the box.
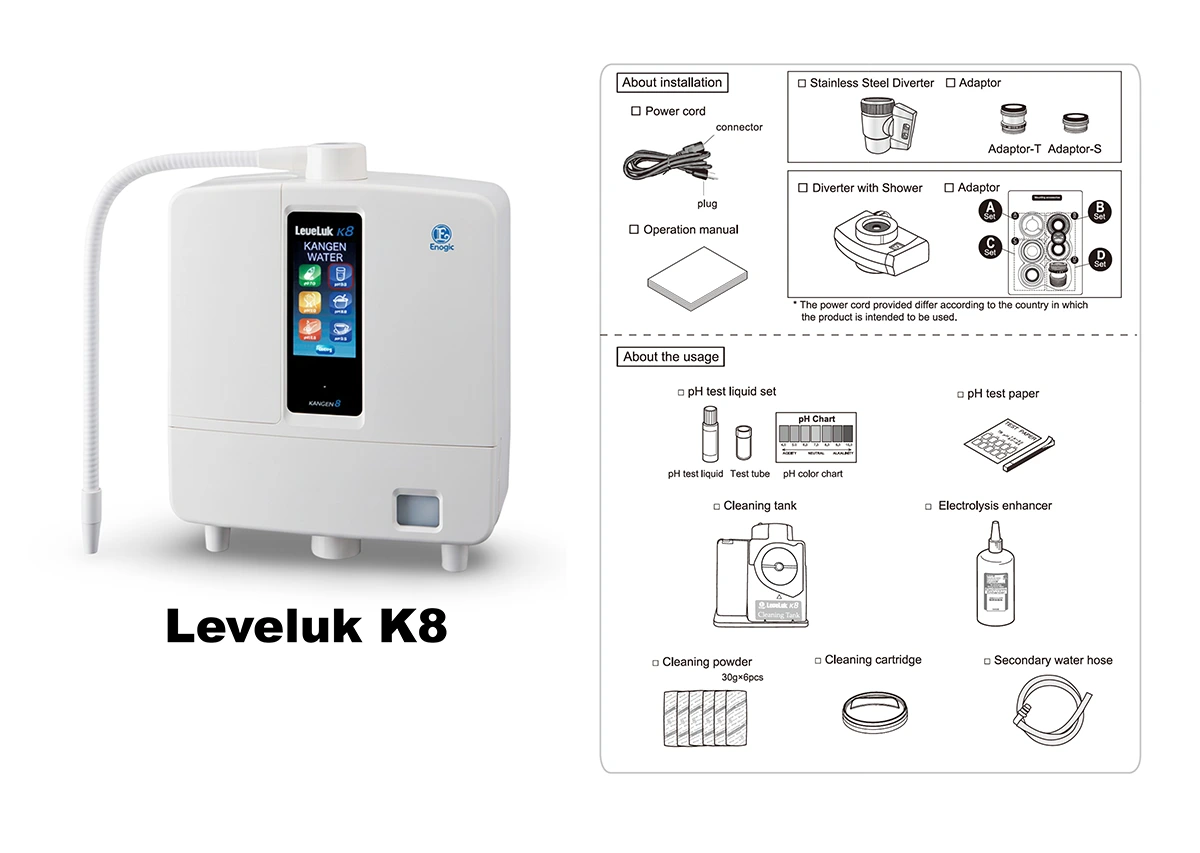
The LeveLuk K8 includes the accessories required for installation, operation, and routine maintenance. As Enagic's flagship residential model, it comes ready for a standard countertop installation using the included components shown below.
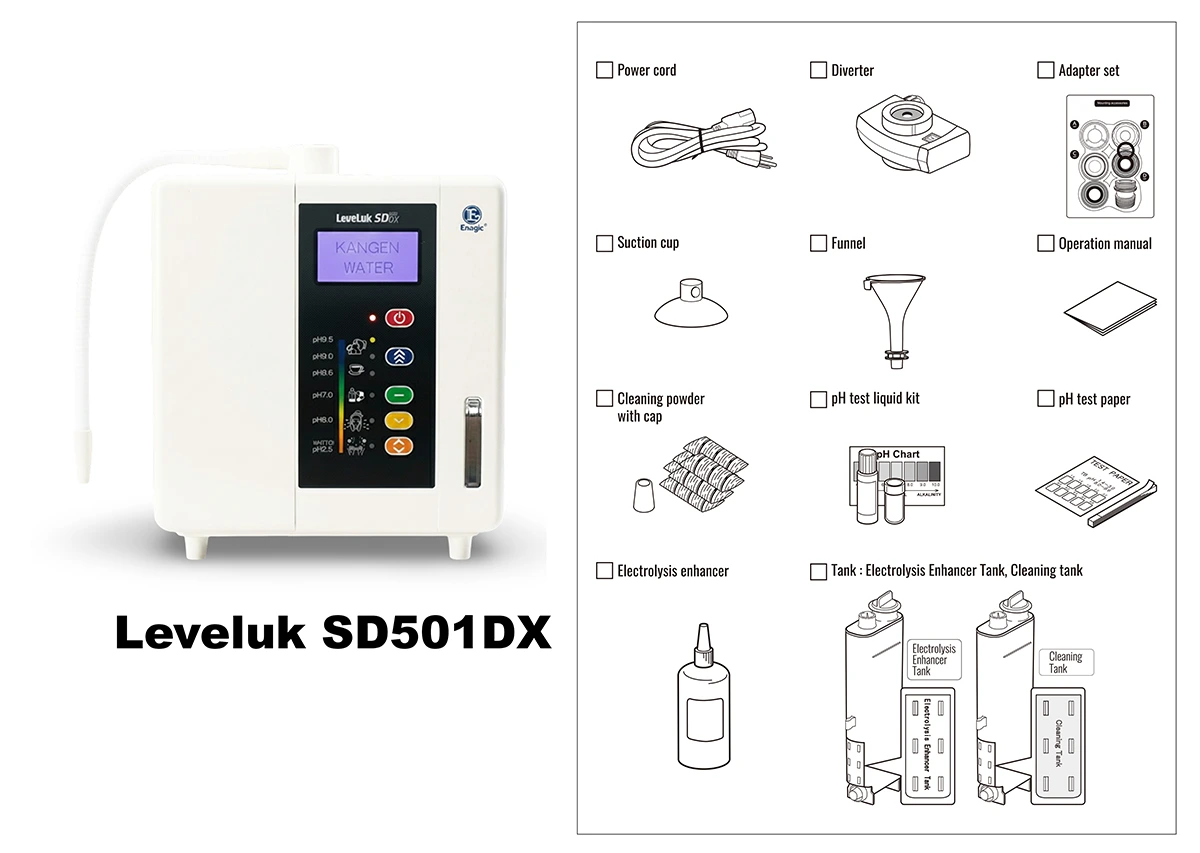
The LeveLuk SD501DX includes the essential accessories needed for a standard countertop installation and everyday household use. Refer to the image below to view the complete package contents supplied with this model.
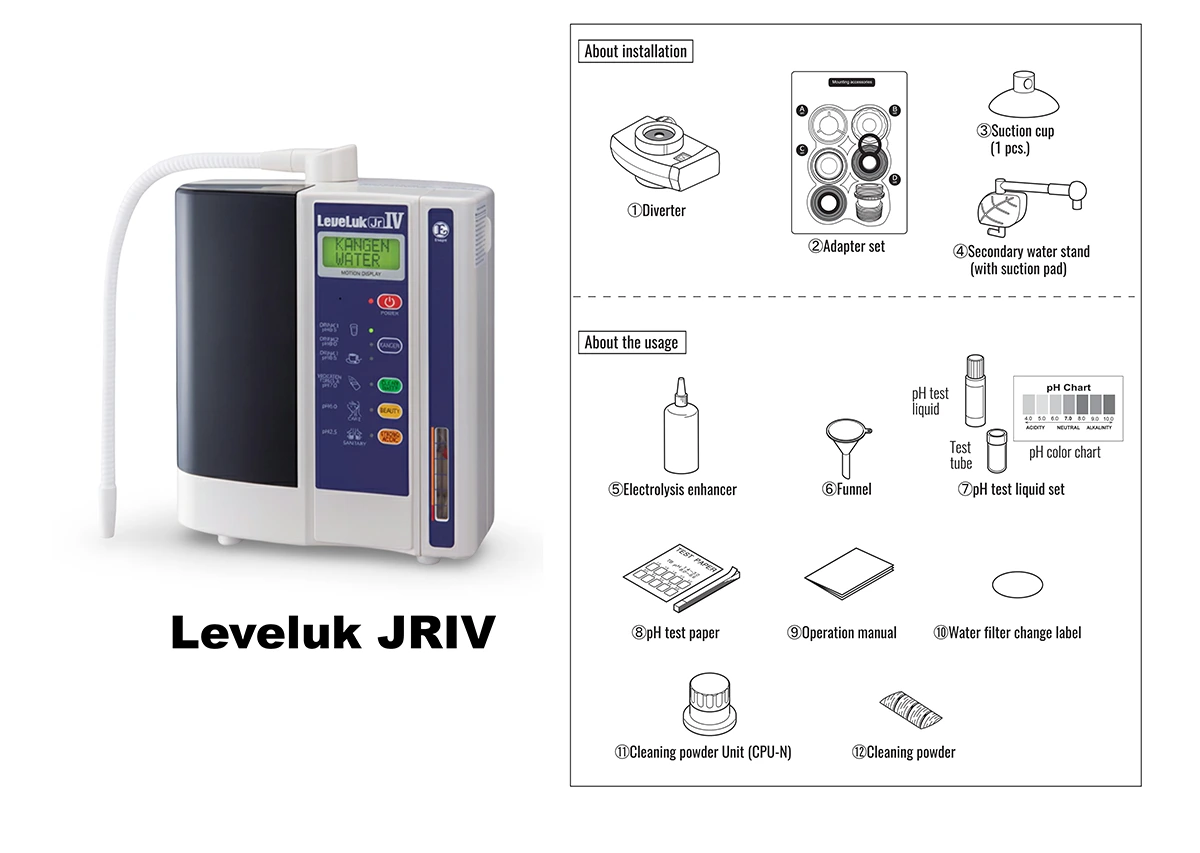
The LeveLuk JRIV comes with the standard installation accessories required for quick and straightforward setup. Designed as a compact model, it includes everything needed for typical residential installation.
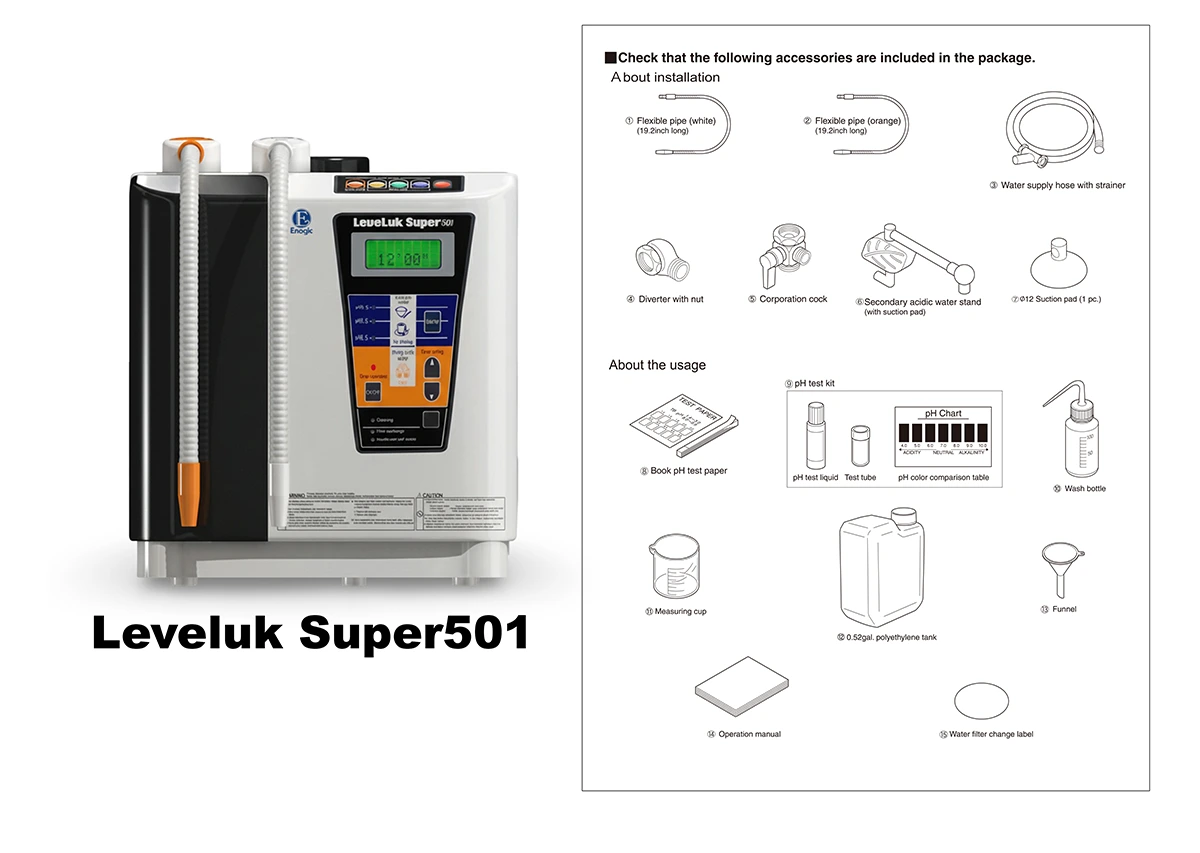
The LeveLuk SUPER501 includes the accessories required for installation and continuous high-volume operation. Refer to the image below to see the components supplied with this commercial-capacity model.
The LeveLuk SD501U includes the accessories required for under-counter installation and daily operation. Refer to the image below for the components supplied with this built-in installation model.

Step-by-Step Installation Guide
Step 1: Prepare the Faucet
Turn off the faucet and remove the aerator at the tip of your faucet. This allows the diverter valve to be attached.
Tip: Most modern faucets are compatible. If not, optional adapters may be required.
Step 2: Install the Diverter Valve
Attach the diverter valve securely to the faucet. This valve allows you to switch between regular tap water and water flowing through the machine.
Make sure the connection is tight but do not overtighten.
Step 3: Connect the Hoses
Connect the inlet and outlet hoses:
- One hose brings water into the machine
- The other returns processed water to the faucet
Follow the color or label indicators provided in the manual.
Step 4: Plug In the Machine
Connect the power adapter and plug the machine into a standard electrical outlet.
Once powered on, the display will activate, indicating the system is ready.
Step 5: Initial Water Flow Check
Run water through the system to:
- Check for leaks
- Flush initial water through the plates
- Ensure stable water flow
This step helps prepare the machine for normal operation.
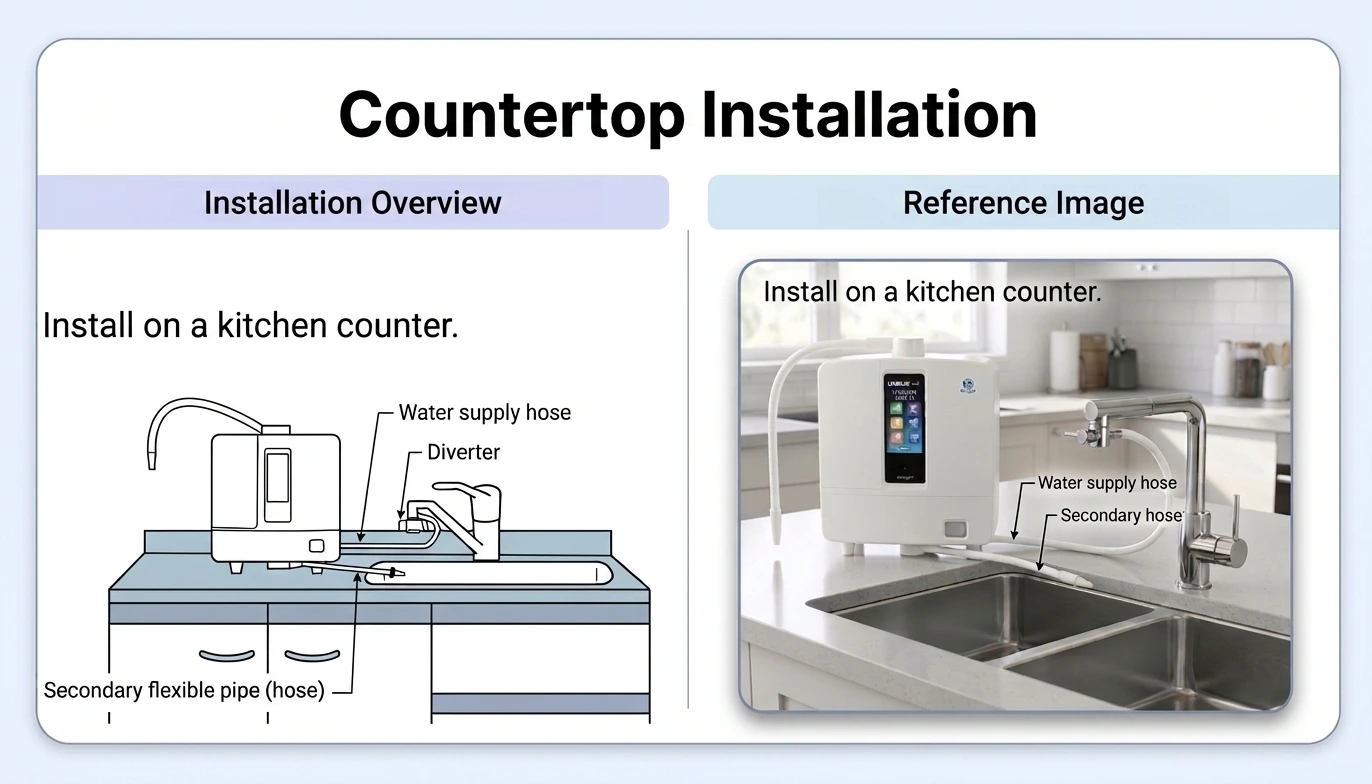
Countertop vs Under-Counter Installation
Countertop Installation
- Uses the existing kitchen faucet with the included diverter valve
- No permanent plumbing modifications for most standard installations
- Typically installed in less than 30 minutes
- Easy to remove or relocate whenever needed
- Ideal for most households and first-time users
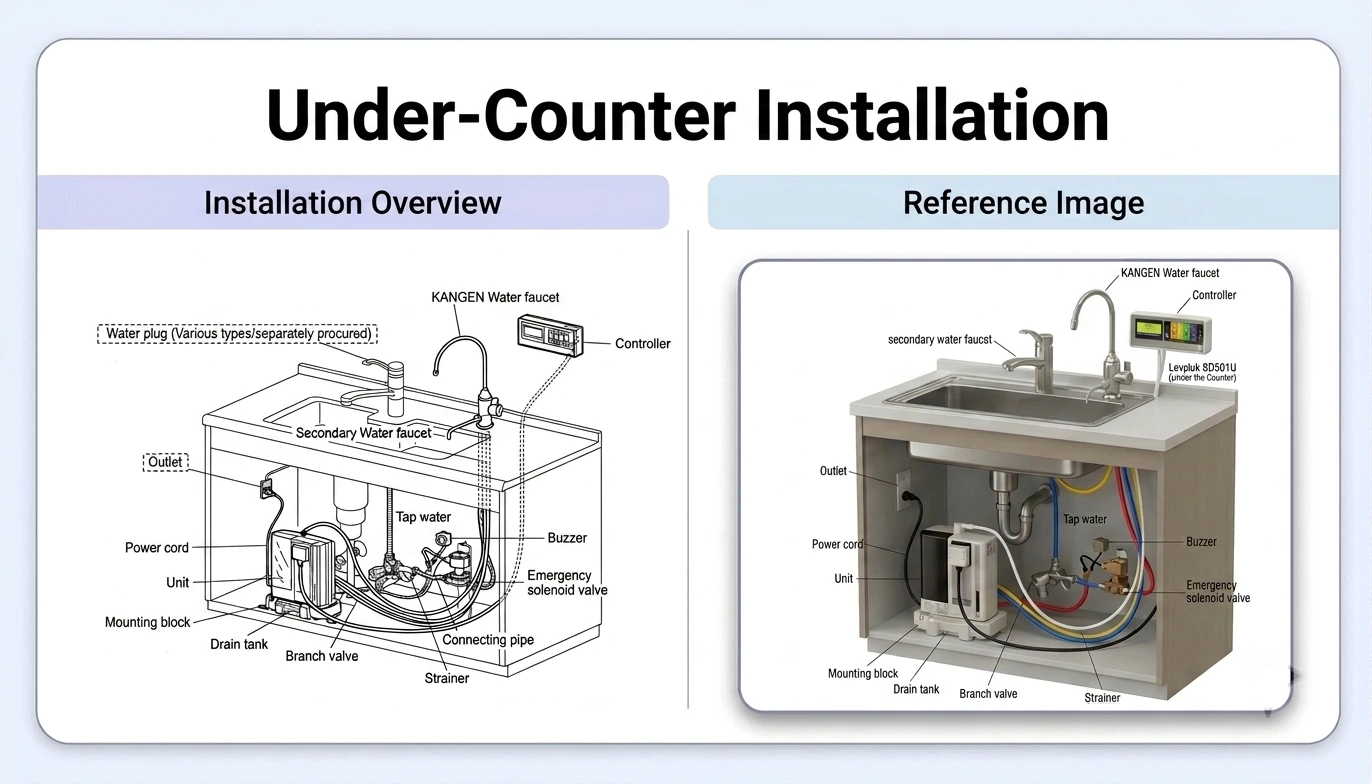
Under-Counter Installation
- Connects directly to the cold water supply beneath the sink
- Typically uses a dedicated drinking water faucet
- May require additional plumbing accessories depending on the existing setup
- Professional plumbing assistance may be recommended for some installations
- Best suited for homeowners seeking a permanent built-in appearance
For most homeowners, a standard countertop installation offers the quickest and simplest setup while providing the same core functionality as an under-counter installation. The choice primarily depends on installation preference and kitchen layout rather than machine performance.
Electrical & Safety Considerations
- Use only the provided power adapter
- Avoid water contact with electrical components
- Do not operate without water flow
The machine automatically monitors internal systems during operation.
First-Time Usage Tips
- Start with neutral or lower pH settings such as pH 8.5
- Gradually explore other water types
- Follow manufacturer recommendations
Proper usage ensures stable performance and longevity.
Maintenance After Installation
Proper maintenance helps keep your Kangen Water machine operating efficiently and ensures consistent long-term performance.
1. Perform Regular e-Cleaning
Run the machine's e-Cleaning program once or twice per month, depending on how frequently the machine is used. This simple maintenance process helps keep the electrolysis chamber clean and can be completed by most users in just a few minutes.
Watch the video belowfor the step-by-step DIY e-Cleaning tutorial.
2. Replace the Filter When Notified
The machine continuously monitors the filter's usage. When it is time for a replacement, a filter replacement notification will automatically appear on the LCD display.
Replace the filter promptly after receiving the notification to help maintain optimal filtration performance and consistent water quality.
Routine maintenance helps ensure consistent machine performance and reliable water output over the long term.
Common Installation Questions
Countertop installation: No. Most users can complete a standard countertop installation themselves in about 20–30 minutes using the included installation kit.
Under-counter installation: In many cases, professional plumbing assistance is recommended, as installation may require a dedicated faucet, additional plumbing connections, or drilling depending on your existing kitchen setup. Plumbing services are not included and must be arranged separately if needed.
Related Guides
- Continue learning with these helpful pages:
- How Kangen Water Machines Work
- What Is Water Ionization?
- Types of Water Explained
- Compare Kangen Water Machines
These guides help you understand both technology and usage.
Final Thoughts
- Installing a Kangen Water machine is straightforward and designed for everyday users. With minimal tools and no permanent changes, most households can complete installation quickly and confidently.
Understanding the setup process helps ensure proper usage from day one.